Copyright ©2025 Fabric | Xytech Help Document Version 1.13
Need Help? Start Here — Welcome to Xytech Help | Xytech Basics | Xytech Notable Features | Using the Help - Best Practices | Xytech Support Web Site
Search List Window
Sample Search List Window – Work Orders
Search List windows are used to locate records for a given application. These windows can be accessed through the Modules pane by expanding a module and selecting a particular application name. They can also be accessed throughout the system via a variety of Lookup Icons and other search tools.
These windows have a variety of features that can help you locate records and then group and sort them so you can find just what you need. Additionally, customized reports can be generated based on the displayed records. You can also open notes for records in the results list by clicking the Notes Icon on the results row. A Notes Window will open so you can review or edit notes, copy text from notes, or use hyperlinks in notes.
The number of rows retrieved through any Search List window is determined by any filtering included prior to starting the search. Xytech Web Client will always return the full set of results based on the search criteria presented, but will only display the number of lines that is established for the User (in the 'Xytech Web Client Page Size' and 'Xytech Web Client Page Size Mobile' fields of the User setup screen). The User can navigate through the full set of search results using the 'Previous' and 'Next' navigation arrows at the top of the search screen.
![]()
Search Results Navigation Arrows
If you have an excessive number of results following a search, considering narrowing your search parameters using one of the many techniques described in this topic.
LAYOUT PERSONALIZATION NOTE
When a user makes a personal change to window size (not including maximized / minimized windows), reorders columns in a list block, or adds custom buttons, those personalizations to the layout can be saved for the user by using the LAYOUT SAVE command from the Tools Button menu . (You can undo window changes and Custom Buttons by using the LAYOUT RESTORE command available from the Tools Button. Custom Buttons can also be removed / moved via the BUTTON CUSTOMIZATION process.)
ATTACHMENT COUNT COLUMN NOTE
Though it has not been added to any standard search list layouts, an Attachment Count Column is available to be added to any custom Search List layouts that act as companions to Maintenance Application documents (e.g., Work Orders Search List, Jobs Search List). Identified by the column header "Attachment Count (documnt) Seq No" , the Attachment Count Column displays the number of attachments linked to each record in the list. Like any other column in the search list, the Attachment Count column can be dragged and dropped into any location on the search results page. Clicking the attachment number opens the ATTACHMENTS WINDOW for the record so that you may review, delete, or otherwise edit existing attachments as well as add any new ones.
Sample Search List Window with Attachment Count Column
The Attachment Count column can be added to a custom Search List layout if the 'Show Attachment Count' field has been checked for a Search List document on the DOCUMENT TABLES TAB PAGE of the Document Customization Application. This prompts the system to add an Attachment Count option to the LAYOUT TOOLS PANE for the document so that you can drag and drop the column to the list block of your custom layout.
INDEXED COLUMN SEARCH REQUIREMENT
Xytech can be set up to require that all searches contain at least one ‘indexed field’. This requirement is designed to assist Xytech when it is asked to perform searches that would otherwise be resource intensive and cause a slow response.
This requirement is specified when Xytech is first installed, or when the application server is reconfigured to enable the requirement. If the application server’s configuration file is updated to include this after Xytech has already been installed, the application server will have to be restarted. If this requirement is not beneficial for your users, the entry that enables it can be removed from the application server’s configuration. Please contact your Xytech Support representative for more information about this.
- If this requirement is in place, indexed fields in Xytech will be marked with an asterisk (*) at the front of the column description.
- If this requirement is in place and no indexed column has been included in the search, the message "At least one indexed *column must be entered when performing a search." will display and the search is not performed.
BASIC SEARCH for Records
Search Criteria with Wildcard
Search Criteria - DropDown Menu, Multi-Select
Enter criteria in one or more of the fields above the columns at the top of the window if you're looking for a specific record or group of records and then hit the Enter key or click the Search Button. The system will limit the results of the search to the records that match the values entered in the fields above each column (if you’ve entered anything at all). If you want to locate all existing records, use the Enter key or click the Search Button without entering any criteria.
SEARCH CRITERIA Usage
- Active: Xytech sets the ‘Active’ box to 'checked' on all filtering criteria by default. This ensures that a Search will return only ‘Active’ rows in the display.
If the User is interested in seeing Inactive rows, then unchecking this box will have the system only return rows marked as ‘Inactive’. If this checkbox has a horizontal line in it, the search will return both Active and Inactive rows.
- Text-Entry: In text-entry selection fields, you can use the wildcard symbol % (percentage) before your text to broaden the search results – the system will include records in the results that have that text anywhere in the field value.
You can also use the semicolon in text-entry selection fields to search for all records that exactly match at least one of the search criteria on either side of the semicolon. For example, entering Editors;Graphics into a text-entry selection field will bring back all records that start with either the word “Editors” or “Graphics” in the records’ corresponding data entry field. (You can use the wildcard symbol % in conjunction with the semicolon to find records that include the designated words anywhere within the text field, for example, %Editors;%Graphics.)
- Numerical: In numerical fields (e.g. ID fields), you can enter a range by using a hyphen between numbers. For example, entering 100–500 into an ID field will prompt the system to bring back all records that have IDs that range from 100 to 500.
You can also use the greater than > and less than < symbols to define a bottom or ceiling in your range of numbers. For example, entering <300 into an ID field will prompt the system to bring back all records that have IDs less than 300.
Additionally, as with text-entry selection fields, you can use the semicolon symbol to bring back those records that match at least one of the search criteria on either side of the semicolon. For example, entering 52;3;678 into an ID field will prompt the system to bring back records 52, 3, and 678.
NOTE
In the Xytech Web Client interface, if you know the ID number of the document you are searching for you can enter that number in the ID search field, hit 'Enter', then hit 'Enter' again to open the Maintenance document.
- Drop-Down: Drop-down fields allow you to select as many values as you need to perform your search. Click in the search criteria box to open the drop-down menu.
NOTE
If a value in a drop-down list field is inactive in its companion setup window or is otherwise changed to not be applicable for the user or the record (e.g., if the value is for another Division or if, on a Media Asset record, a value is for a different Asset Type), that value will still display in the field if the 'Allowed' field in the drop-down window is unchecked, but it will display in red text.
- Application: Fields that link to other application records (e.g., Jobs) include a Lookup Icon that opens a secondary Search List window to help you locate the desired record(s). Select one or more of the results in the secondary window using the Shift + click and Ctrl + click selection methods and use the Apply Button (or OK) to include those records as criteria in your primary search.
- Date: Date fields allow for searching based on a specific date range or just a beginning date. To quickly set the date and time (if applicable) to the current date and time, simply click the “T” key when your cursor is in a date field to set the date to today or the “N” key to set the date to today and the time to the current time (“T” for “today” and “N” for “now”).
If you use the Calendar Icon in a date field, a Date Select Window will open. You may select a single date using the Calendar. To select a range of dates, Click the 'Filter' button on the search window to open the Advanced Search window where you can select a range of contiguous dates.
Date Select Window
Clicking the 'Relative' hyperlink opens the RELATIVE DATE/TIME window.
DATE-TIME SELECTION NOTES
- Using the Calendar icon, or the ‘T’ shortcut, to select a date for either a report or a search will fill the same date to both values of the date range. Ensure that the second date in the range is set to the value you need prior to running the report or search. This only works for ‘date only’ fields, not for ‘date/time’ fields.
- For Date/Time fields, the 'T' and 'N' shortcuts will work as follows:
- When entering 'T' or selecting a date from the calendar in Date/Time field, today's date will be entered with a time value of 12am.
For example, today is 02-13-2018 10:07 AM. If 'T' is entered in the Order Begin Date field the following value will be populate '02-13-2018 12:00 AM'. This value will be entered in the upper and lower bounds.
- When entering 'N' in Date/Time field, today's date will be entered with a time value of the current time.
For example, today is 02-13-2018 10:07 AM. If 'N' is entered in the Order Begin Date field the following value will be populate '02-13-2018 10:07 AM'. This value will be entered in the upper and lower bounds.
- If the upper bound and lower bound time is the same, the upper bound will be ignored, which will return all data with the lower bound time and after.
For example, if the user enters a range of '02-13-2018 10:00 AM - 02-13-2018 10:00 AM' into the Order Begin Date field, the system will evaluate the lower bound value of '02-13-2018 10:00 AM' and return data that has an Order Begin Date value of '02-13-2018 10:00 AM' or later.
Note: You can search for records based on content in Notes on each record by first clicking on the Notes Icon in the criteria area above a Notes column to open the 'Rich-Text Notes' Search Fields.
These fields allow you to search for records based on Notes that have been added to them.
Rich-Text Notes Search Fields
NOTE
The Wildcard Search Field allows you to search Notes based on just part of a word. With this field, you can search for all Notes that begin a certain way (e.g., "The cat") or contain certain letters (e.g., "%cat").
This Wildcard search involves searching of the plain text of Notes rather than a word index, which the other four search fields use. Thus, searching by the Wildcard field will be a slower search, in some cases notably.
Once you have defined your search criteria, use the Enter key or click the Search Button. The system will display those records that meet your criteria.
NOTE
If a field in a Search List window’s resulting list of records displays in red text, this means that the value in that field was made Inactive in the field’s companion setup window after being assigned to the record.

ADVANCED SEARCH for Records
For additional search criteria and to search by record creation dates, click the 'Filter' button found at the top left of this window.
![]()
A new Criteria Window will open in which you can define your search criteria. Click the Search Button in this window when ready to perform your search.
Example Advanced Search Area – Work Order Search List Window
Additionally, this Criteria Window may have one or more Rich-Text Notes Search Areas that function like the Rich-Text Notes Search Fields available from Search List windows.
Example Rich-Text Notes Search Area – Jobs Search List Window
Rich Text Search supports searching against character based data. When a word is searched the index will find all forms of the word. If you search for ‘foot’ you will get results with both ‘foot’ and ‘feet’. There is also something called 'stop words' (stop list - defined at the database level). These words are ignored when text is being searched. Examples are ‘the’, ‘a’, ‘is’ etc..
Xytech has the ability to search by ‘With all of the words’, ‘With at least one of the words’ and ‘With the exact phrase’.
- ‘With all of the words’ – must have a form of every word entered, not including stop words. For example ‘The cat in the hat’ will search for all forms of ‘cat’ AND ‘hat’
- ‘With at least one of the words’ – must contain a form of at least one of the words, not including stop words. Using the ‘The cat in the hat’ example will result in a query that finds all forms of ‘cat’ OR all forms of ‘hat’.
- ‘With the exact phrase’ – must match all forms of the exact phrase. Using the previous example, ‘The cat in the hat’ will result in finding a record that contains ‘The cat in the hat’. If you enter a single word in this field it will result in finding forms of the word, the same as entering ‘With all of the words’.
TIP!
Use the ADDED / CHANGED AREA of the Criteria Window to search for records based on a date range during which the records were last changed or first created.
SORTING Records
Once you have performed a search, you can sort the resulting records alphabetically / numerically by simply clicking on a column header. Click on a column again to reverse the sort.
REARRANGE COLUMNS in the Search List Window
At any time, you can drag and drop a particular column to another location to customize the display order of the list. Select a column and move it along the column row. The columns will be highlighted with arrows indicating where the column being moved will be placed. When you release the mouse, the column you are moving will be placed to the left of the highlighted column.
Drag and Drop a Column Example
Moving the W/O Begin Column before the Description Column
Once you have rearranged the columns so that they best fit your needs, you can save this column order by using the Layout Save command available from the Tools Button . (You can reset the columns back to their standard order by selecting the Layout Restore command from the Tools Button menu.)
GROUPING Search Results
Once you have performed a search, you can then group the results by specific field columns. The Group Box Area may display by default, but you can always show or hide the area by clicking the 'Toggle Grouping Area' command available from the Tools Button .
When you drag one or more columns from the search list into the Group Box, the list will sort by those columns. The dragged columns disappear from the search grid and are stacked in the Group Box Area. The stacking order determines which column will be the primary group and which will be the subordinate group(s). In the screenshot below, the work orders are first grouped by the Phase column values and then by the Work Order Type column values.
You can use the Expand or Collapse Icons next to the grouped results to expand or collapse the results, showing as little or as much detail as you want. You can expand groups down to the individual records.
Group Box Example
Once you have grouped your results, you can remove columns from the grouping area by clicking the 'X' icon in the Column name. The display will adjust accordingly.
Click to remove column from Grouping Box
FILTER Search Results
In addition to grouping search results, you can also filter the results, reducing the number of records in the list. There are several ways to filter the list, but the most convenient is by entering text in the Filter Row. Enter filtering criteria in one or more columns prior to clicking the search icon to create a refined search results list. Use wildcard and other search techniques to achive the desired results.
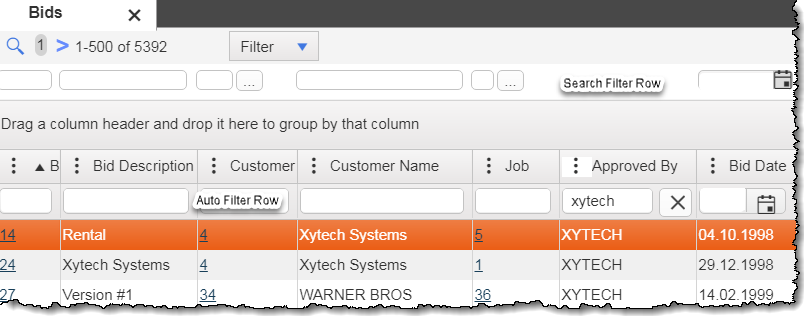
Once you have had the system perform a search, you can further filter the results using the AutoFilter Row. The AutoFilter Row is located below the column headers and can be displayed or hidden by clicking the 'Toggle AutoFilter Row' command available from the Tools Button . Enter one or more letters or numbers in the column's AutoFilter cell. When you exit the cell, the column will be filtered and the results will be shown immediately . You can continue to narrow search results by entering criteria in multiple AutoFilter Row cells.
EXAMPLE
If you enter a value in the Customer Name cell in the Filter Row, then click the search icon, the system will display all Work Orders for that Customer. You can then enter "Confirmed" in the 'Phase' AutoFilter cell and "Duplication" in the 'WO Type" AutoFilter cell. The remaining values in the Search window will be all Work Orders for the selected Customer with a Phase of 'Confirmed' and a W/O Type of 'Duplication'.
Filtering Example
Another filtering option is the Column Filter Icon , which appears as an option when right-clicking on a column header cell.
Column Filter Window
Clicking this icon reveals a drop-down list that displays all of the search arguments (e.g. 'contains', 'is equal to', 'starts with'). Click on the argument you want to use, then enter the search value the system will check for using that argument. Click on 'Apply Filter' to have the system refine your search immediately. (You cannot select more than one field value in this drop-down list.) Click on 'Clear Filter' to erase the information you have entered into the filter.
REPORTING NOTE
If reports are available via the ACTIONS BUTTON and you run a particular report, the system that will only use those records that meet the filtering criteria to generate the report.
SAVING FILTERS NOTE
If you filter the items displayed in a search list window, that filter only applies for that one instance. You cannot save filters established at runtime by using the Layout Save command available from the Tools Button . However, you may create a CUSTOM LAYOUT, establish filters as described in this topic, and save them to that custom layout. Whenever users access that custom layout, the defined filters will already be in place. Users can adjust or remove the preset filters as necessary at runtime, but for that layout the filters will always be in place initially.
AUTO FIT Columns
By double clicking the line between columns, you can prompt the system to automatically resize the column to the left to best fit the contents of the header and all of the field values.
W/O Begin Column Before Auto Fit W/O Begin Column After Auto Fit
MODIFY Totals Rows
Totals rows found at the bottom of many search list windows and list block areas can be customized by using the right mouse button. By right clicking a column header, the column can be set to show a total in a variety of ways or to hide a total.
Totals rows only total those line items that appear in the window, so if you filter out some of the items in the list, the totals row will recalculate to compensate.
NOTE
You can save your Totals Row settings by using the LAYOUT SAVE command available from the Tools Button. (Once saved, you can reset the settings by selecting the Layout Restore command in the Tools Button menu.)
SELECT One or More Rows
You can select rows in a search list window or list block area in several ways:
- Click one row and drag your cursor up or down to select adjacent rows.
- Click one row, hold it down while also pressing the Shift key, and then select another row. All the rows between the two rows will be selected.
- Click multiple rows while also pressing the Ctrl key to select individual rows.
- Use the Ctrl + A keys to select all rows visible in the list.
OPEN/EDIT Existing Records
After locating the desired record row, click the hyperlink in the ID field, generally found in the first column of the window. The window that opens for the record will likely be an APPLICATION MAINTENANCE WINDOW.
OPEN/EDIT Related Records/Windows
Certain search list windows will contain additional hyperlinks beyond the ID for desired record. These will open records related to the selected line item.
CREATE New Records
You can create new records from this window by clicking the Plus Icon in the navigation bar at the top of this window
Using SAVED SEARCHES
If you commonly use the same search criteria to locate records, you may want to save a particular set of values to the Saved Searches list.
- Enter the desired criteria in the search fields above the columns in this window.
- Click the 'Filter' drop-down menu at the top of this window. Select 'Create Filter'.
![]()
Filter drop-down Select Partial Menu - Select 'Create Filter'
- The 'New Search' Window opens.
NOTES
- The 'Update Filter' command modifies the currently selected saved search to reflect the search criteria entered in the window. You can click the 'View Saved Filters' command to manage other saved searches.
- In Xytech Web Client, the 'Create Filter' and 'Update Filter' commands will save all filtering criteria in the Filter and Auto Filter rows. The Layout Save command will not save filtering criteria in these fields.
- In Xytech Web Client, the ‘Save Dashboard’ command will now incorporate Filter criteria set either directly in the ‘Auto Filter Row’, or via ‘Column Settings’ > ‘Filter’ > ‘Show rows’.
- Enter a name for your search in the 'Description' field of the Search Criteria (New) Window and define the parameters of the saved search.
- The Public Field determines if everyone has access to this saved search or only you do (Private search). Activate the checkbox if you want others to be able to use the search. (If you check this field, the Default Field may not also be checked.)
- The Default Field determines whether the saved search will be your default search. You can override the default if necessary. (If you check this field, the Public Field may not also be checked.)
- You may only set one saved search as the default per layout. If you check the Default Field on a second saved search, the system will automatically uncheck the field from the first saved search.
- If you save a Search with the 'Default' field checked and the 'Public' field unchecked and another user saves a Search with both the 'Default' and 'Public' fields checked, you may see two 'Default' searches listed. The Private search will be the designated Default search in this case.
- When creating a new filter, the Auto Search checkbox will be checked by default. Uncheck this box if you do not wish the new filter to perform an Auto Search. If you leave the Auto Search Field checked, the system will automatically run the saved search when a search list window is opened and that saved search is your default (i.e., the Default Field is checked). If the Default Field is not checked but the Auto Search Field is, the system will automatically run the saved search when it is manually selected from the drop-down list.
- The Division drop-down allows you to select a specific Division to which this saved search will be assigned. If the field is left blank, the saved search will be available to all Divisions (if you are using the Divisions functionality).
- When a Search Window is open, preliminary Search criteria is entered in the Search Filter row. When that search has been done, the results can be further narrowed by entering criteria in the ‘Auto Filter’ row.
Xytech Web Client Search Window with Auto Filter Row Shown
If you save a Search Window as a favorite by setting up the search criteria and then dragging and dropping the Search Window Tab into the ‘Favorites’ area of the Navigation Panel, and search criteria has been added, only the criteria in the Auto Filter row will be saved. Any criteria in the Search Filter row will not be saved as part of the ‘Favorite’.
- Click the 'Save and Close' Button to save the search. You will now see the search description in the drop-down field for 'Filters'. It will also appear in the list generated when you click the 'View Saved Filters' command.
- When you select a saved search from the drop-down list, the search criteria assigned that saved search will automatically fill the appropriate fields.
NOTES
- When creating a Saved Search to run a report, you will likely want to save Date Criteria fields as Relative Dates and/or clear default values. If the date is a required field for the report, leaving it blank ensures the correct date will have to be entered prior to running the report.
- When using the Xytech Web Client User Interface, saving a Search with a blank Date field will leave the field empty when the Saved Search is used.
- The default report template includes the company name, user name, and date/time the report was executed on the footer of each report.
- A ‘Separate by Resource’ criterion has been added to the following reports. When checked, the results will be parsed into separate reports by each Resource included in the report. Any Transaction without a Resource will be treated as a “null” Resource.
- Call Sheet Report
- Resource Calendar Report
- Scheduling Resources Report
- Entitlement/Off Time Report
- Resource Off Time Report
- Transaction Reports
- Order Transaction Report
- Resource Schedule Report
- Weekly Schedule Report
- Resource Utilization Report
- A ‘Send Now’ button has been added to all reports. When selected, the preview and send (i.e. Scheduled Report) windows will not open. Rather, the system will send the report through email using the defaults.
LAYOUT NOTES
- Saved searches are stored by the system at the layout level, not the document level. So, if you save a search for one layout, it will not be available for any other layout.
- If you would like to customize the Saved Search Window, create / edit a custom layout for the Search Criteria document (XeSearchCriteria, Doc ID = 10440).
SECURITY NOTE
You will only be able to access and save searches if you have been given permission to create and edit items on the Search Templates (SysSearchTemplate, Doc ID = 10425) and Search Criteria (XeSearchCriteria, Doc ID = 10440) documents via the ROLE MAINTENANCE APPLICATION.
GRID ROW Commands
There are several commands that can be used in conjunction with Search results. Highlight one or more rows in the Search results window to perform any of these actions.
Add Row(s)
Click the 'Plus' icon to have Xytech Web Client open a 'New' window of the type that was searched. (e.g. a 'Work Orders' search window willl open a New 'Work Order' document, a 'Jobs' search window will open a New 'Jobs' document.)
Delete Row(s)
This option may not be available in all search list windows and list block areas.
Click the 'Minus' icon to have Xytech Web Client delete the selected row(s).
NOTE
To protect critical accounting information, you may not delete Orders (Work Orders, Media Orders, Transmission Orders) after they have been created. You must use the Cancel/Void Order Actions Button menu command to cancel or otherwise void an order.
Duplicate Row(s)
Click the Action Menu icon and then the Duplicate icon to prompt the system to duplicate the selected row(s). This process may involve the launch of a duplication window that will allow you to control how the system makes duplicates of the record(s).
NOTE
When one or more records are selected for duplication throughout the system and at least one of them contains an inactive or inapplicable field value, you will be shown a warning message to that effect. The duplication will be allowed to continue. (This message does not indicate which of the original records have inactive / inapplicable values.)
Export Selected Rows
This command immediately exports the selected rows to your device in an Excel spreadsheet format.