Copyright ©2025 Fabric | Xytech Help Document Version 1.13
Need Help? Start Here — Welcome to Xytech Help | Xytech Basics | Xytech Notable Features | Using the Help - Best Practices | Xytech Support Web Site
Application Maintenance Window BUTTONS AND TOOLS

Sample Application Maintenance Window – Job, Work Orders Tab Page
The following information details the buttons and tools that are available in each APPLICATION MAINTENANCE WINDOW.
BASIC BUTTON Definitions
![]()
![]()
Save & Close
Click this button to close the window and save any unsaved changes to the current record, close the current tab, and release the record’s lease.
Cancel
This button is part of the tab for the document window, at the top of the page. Click this icon closes the window and disregards any unsaved changes to the current record and releases the record’s lease.
Save
Click the floppy disk icon to save changes to the current record and release the record’s lease.
Attachment
Clicking this icon opens the Attachments Window so that you can link one or more files to the current record or download any attachments already linked to the record. If attachments have already been linked to the current record, the number of attached files will be listed in the button.
Change Requests
Clicking this icon opens the Change Request window, allowing you to see any change requests associated with this record. If any Change Requests are attached to this record, the number of requests will be listed in the button.
NAVIGATION BUTTONS Overview
A set of navigation buttons is available as a fixed feature on all maintenance application windows that have been opened via a search list window. These navigation buttons allow you to navigate to (open) the previous or next record in the list without leaving the window. When a button is clicked, the maintenance application window remains open but the data refreshes to reflect that of the newly opened record.
These buttons will not be available if you open a maintenance application record through means other than a search list window, for example, from the FAVORITES menu list, from the RECENT DOCUMENTS control tab, or via a HYPERLINK on another maintenance application record.
NOTES
- If a search list window is refreshed, and the currently open maintenance application record is no longer in the list, the navigation buttons will not be available.
- When using search list windows that display multiple records tied to one other single record (e.g., W/O TRANSACTIONS SEARCH LIST) the navigation buttons will navigate to the next unique record.
Go to Previous
Moves to the record directly above the open record in the search list window.
Go to Next
Moves to the record directly after the open record in the search list window.
ACTIONS BUTTON Document Definitions

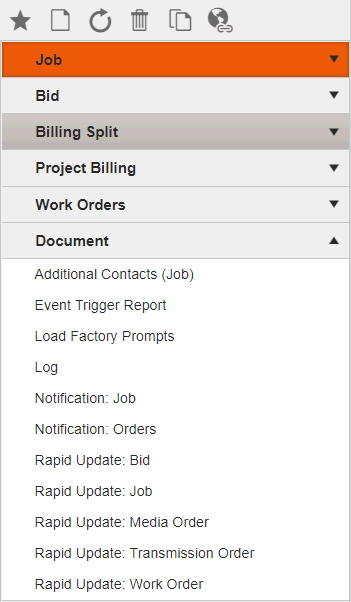
Sample Actions Button, Document Submenu – Job Maintenance Application
The Actions menu provides access to several commands, processes, and options related to the current document.
- Some actions perform a single command on the current document.
- Some actions are toggle options that can be clicked to turn the option “on” and clicked again to turn the option “off”. In the Action menu item, a checkmark will display in the menu to indicate the state of the toggle. For example, in the Schedule Book, several of the Filter options can be toggled on and off.
- Some actions perform complex workflows, and may launch additional documents in order to do so. For example, the 'Check In/Check Out' option launches the appropriate form to check items into (or out of) the current document.
- Some actions launch related documents using information from the current document. For example, in Work Order, Media Order, and Transmission Order documents, the 'Order Transactions' option launches the Work Order Transactions document to display transactions for the current Order.
- Some actions perform commands or workflows on a related document without leaving the current document. These options are generally listed in a section named after the related document.
Several commands are available from the Document submenu of the Actions Button of every application maintenance window. Following are definitions to those standard actions. Actions that are unique to particular application maintenance windows are covered in their corresponding Help topics.
Additional Contacts (Document)
Accesses the Additional Contacts List Window so that you can view the Additional Contacts lists associated with the current record, assign other existing lists to the record, or create new lists and link them to the record. You can also review and revise the Additional Contact list records as needed.
Event Trigger Report
This will only be available if the current document has at least one event trigger established for it in the EVENT TRIGGERS SETUP WINDOW.
This report allows you to determine if and why an event trigger will fire for a given record based on settings established in the EVENT TRIGGERS SETUP WINDOW. Using this report can help you when establishing event triggers to ensure that you have met all desired triggering parameters or to otherwise diagnose the current functionality of your event triggers.
This report must be run prior to saving a record or window. The report will display all of the event triggers established for Xytech and whether or not each event trigger applies to the current record. If an event trigger applies according to the report, when you save the record or window, the event trigger will be activated and its associated functionality will be carried out (e.g., a notification will be sent).
NOTE: You must run the report before saving a new or changed record for the system to be able to determine if the record meets any event trigger criteria.
Rapid Update (Document)
This command is only available if there is a list block on the current layout that links to a search list document (e.g., Work Orders on job records).
This feature allows you to update a wide variety of field values for one or more records selected in the current search list window.
Refer to the RAPID UPDATE definition in the Search List Window’s Buttons and Tools topic for details on the Rapid Update feature.
TOOLS BUTTON Standard Definitions
![]()

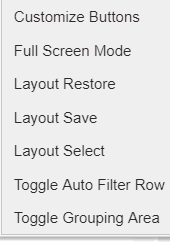
The Layout Settings Button contains several features that you can use to work with the currently selected window. The functionality of those commands is identical regardless of where you select them.
Customize Buttons
Each user has the ability to change any Actions Button menu command into a button via this command. When you use this command to open the Customize Menu Window, you may save your commonly used Actions Button menu items as buttons for quick access. (You can also create buttons for commands in the Xytech menu bar.)
Example of a Customized Button
Refer to the BUTTON CUSTOMIZATION STEP-BY-STEP topic for details on how to use this feature.
NOTE: There are Action menu commands in various documents throughout the system that are toggle options. This means that selecting the Action once turns the option “on” then selecting it again turns the option “off”. In the Action menu item, a checkmark will display in the menu to indicate the state of the toggle. The same checkmark will be displayed on any buttons created from the Action Menu commands.
Full Screen Mode
Click on this command to have Xytech Web Client go into Full Screen Mode. Press <ESC> to exit Full Screen Mode.
Layout Restore
Clears any customized layout properties and grid (list block) settings, including changes to window size, tab and radio button positions, custom buttons, column order settings, sorting conditions, filter settings, or column width changes that you have assigned to the current application maintenance window. This command will restore the current layout to its settings as defined in the Layout Application.
Layout Save
When you make a personal change to window size (not including maximized / minimized windows) or add custom buttons, those personalizations to the layout can be saved for your user ID by using this command.
This command also saves any customized grid (list block) properties. Grid properties saved include column order settings, column filters, sorting conditions, Group Box Area settings (regardless of whether the Group Box Area is currently showing or not), totals row settings, and column width changes that you have assigned to the current application maintenance window.
IMPORTANT!
If you use this command on a window and the layout itself is changed (e.g., new fields, new field order), you may not see these changes until you use the Layout Restore command. When a layout is saved via the Layout Application, the system gives the you the option to clear all customized user settings for the layout (i.e., run the Layout Restore command for all users) so that any changes to the layout will show by default or to leave customized user settings as they are. If you choose to leave customized user settings as they are, changes made to the layout will not display until each user applies the Layout Restore command themselves.
CUSTOM LAYOUT NOTE
While you can save individual user changes to windows with this command, you may also create a CUSTOM LAYOUT with default sorting, filtering, grouping, etc. properties. Whenever any user accesses that custom layout, the defined settings will already be in place. Users can adjust or remove the preset properties as necessary at runtime, but for that layout, the settings will always be in place initially.
Layout Select
Opens the CHOOSE LAYOUT WINDOW so that you may select a different layout for the current window (if one is available).
TIP!
When you click on this command, the Choose Layout window will open and the name of the current layout will be indicated in the radio button next to the layout names. This is helpful if you have multiple layouts for a particular document (e.g., Work Order Transactions and Work Order Bookings) and you need to identify which layout you are using.
Toggle Auto Filter Row
The Auto Filter row is available in list areas and lies just beneath the column header row. It is used for further filtering results of a search. This row is normally hidden but can be either exposed or hidden by clicking on this command.
Toggle Grouping Area
The Grouping area is available in list areas and is found above the column header row. The Grouping area is used to take search results and group them based on the columns moved to the Grouping Area. This row is normally hidden but can be either exposed or hidden by clicking on this command.
Time Zone
This command will only be available if you are licensed and configured for the MASTER TIME feature.
Use this command’s drop-down list to define a time zone that is different than the system’s time zone for the currently opened application maintenance window. The time zone you select cannot be saved as the window’s default time zone. It will affect the current session only.
NOTE: If you change the time zone for a particular window it will only adjust the dates and times for the current window and any other windows you open from that window. For example, if you change the time zone of the Jobs Search List Window, any job records you open will also be set to that time zone, and any work order records you open from that job will also be set to the same time zone.