Copyright ©2025 Fabric | Xytech Help Document Version 1.13
Need Help? Start Here — Welcome to Xytech Help | Xytech Basics | Xytech Notable Features | Using the Help - Best Practices | Xytech Support Web Site
Attachments Window

Sample Attachments Window
The Attachments Window opens when you click the Attachment Button found in the upper right corner of all Application Maintenance Window BUTTONS AND TOOLS as well as all setup windows or if you click the Attachment Count Column hyperlink in certain instances of the Search List Window. This window allows you to associate one or more third-party files with a particular record or setup window.
Linking a File to a Xytech Web Client Document
To link a file as an attachment to a maintenance document:
- Add a line to the window using the Plus (+) icon,
- Ensure the 'Type' field is set to a 'Document' type file (e.g. Excel, doc.x, PDF).
- Click the 'Select' command in the 'Action' column (the prompt may be hidden by the fill color used in the box.). This will open a Browse dialog box, which allows you to locate and select the file(s) you wish to attach.

NOTE - Certain attachment types, as established in the Attachment Types Window, open default folders. Selecting one of these attachment types before clicking the Attachment Icon will allow you to access a particular folder without the need for browsing for a file.
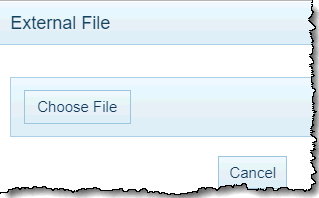
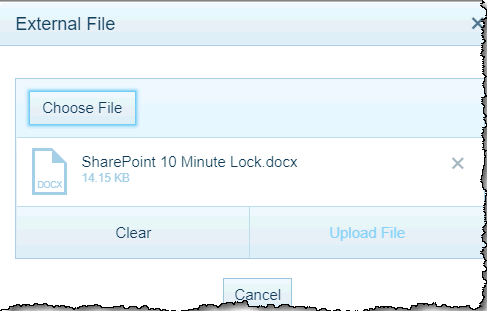
- Click 'Choose File'. This will open a browser window on your device that allows you to select a document to attach to the Xytech Web Client maintenance document. Click the document you want to attach and then click 'Open'. The selected document will appear in the Attachment box.
- Any configured ‘Upload to Server’ extension may be uploaded. Xytech Web Client resolves the attachment type and then computes upload location. Xytech Web Client will return an error message if the file extension is not available.

- Click 'Clear' to remove the document and search for a different one. Click 'Upload File' to attach the document. Click 'Cancel' to abandon the attachment process.
- Any configured ‘Upload to Server’ extension may be uploaded. Xytech Web Client resolves the attachment type and then computes upload location. Xytech Web Client will return an error message if the file extension is not available.
- The rest of the fields in the Attachment row will fill automatically. Click the Save (floppy disk) icon or the Save & Close button to finalize the attachment. The 'Action' field will now read 'Download' instead of 'Select'.
If the document is stored on a network storage device (like a network server), attach the file using its URL:
- Add a line to the window using the Plus (+) icon,
- Ensure the 'Type' field is set to a 'Stored' type file (e.g. Network Folder, URL, Hyperlink).
- Copy the URL used to access the document and paste it into the new line in the 'Path/URL' field. The system will fill in the rest of the fields on the new line.
IMPORTANT - Xytech Web Client will automatically fill in the characters "http://" in this field. When you paste the URL into this field, ensure that the 'http://' is not duplicated or the system will be unable to fetch the attachment. You may want to delete the system-generated "http://" from the field prior to pasting your information to eliminate this problem.
- The system will put the URL into the 'Description' field. You can leave that entry as it is or replace it with a user-friendly description of the attached document.
- Click the Save (floppy disk) icon or the Save & Close button to finalize the attachment. The 'Action' field displays 'Open' instead of 'Select'.
Retrieving an Attached File from a Xytech Web Client Document
- Open the Attachments window.
- Locate the file you want to view.
- Click the 'Action' column for that row. The file will be downloaded to your device if its Type field indicates it is a document. The document's original filename will be used as the download file name. The file will open up on your device if its Type field indicates it is a URL or Hyperlinked attachment.
Deleting an Attached File from a Xytech Web Client Document
To delete an attachment row, highlight the row and click the Minus (–) icon at the top right corner of the window. Deleting the attachment row will cause a popup notification to appear, informing the User that this action will attempt to delete the file from the server.
NOTE: If you want all users to have access to attachments, attachment files should be stored in a location on a server to which all users have rights. An attachment type can be set up so that when users save changes in the Attachments Window, the system automatically copies the attachment file that has been assigned the special attachment type to a defined location on the server, thus making a local file available to all users. (Refer to the ATTACHMENT TYPES WINDOW topic for details.)
ATTACHMENTS SECURITY
On the Document Rights Tab Page of the Role Maintenance Application, there are three attachments security fields:
- Can View Attachment
- Can Add / Edit Attach
- Can Delete Attach
The Yes and No values in these fields control user access to attachments on a per document level. Set the values in these fields to either Yes or No for the documents you wish to grant access when a particular role is assigned to a user.
You also have the ability to establish security rights for all attachments on a role via the Attachments document (Doc ID 10435), which is used to create layouts for this window. To use this ability, you must set the Can View Attachment, Can Add / Edit Attach, and/or Can Delete Attach Fields on documents added to a role to a value of Inherit. When this value is assigned to the attachments security fields, the system will use the values set on the Attachments document's Can View, Can Add, Can Edit, and Can Delete Fields. This allows you to control attachments access at a global level for a role; changing the settings on the Attachments document will be carried to all other documents with the corresponding field set to Inherit.
XYTECH CLOUD NOTES
- Attachments support is available if you access Xytech Web Client via the Xytech Cloud and you store files on a file-hosting service (e.g., Microsoft® OneDrive® or Dropbox®).
For users accessing Xytech Web Client via the Xytech Cloud, it is recommended that you create a special layout for the Attachments document (check the Xytech Web Client Field in the LAYOUT PROPERTIES WINDOW and uncheck the Windows Client and Phone Fields) that includes the Attachment Column (i.e., the same as the Xytech Standard layout).
- Xytech Cloud customers using the Smart Client version of Xytech may not use the attachments feature as it is a security risk.
For users accessing the Smart Client via the Xytech Cloud, it is recommended that you create a special layout for the Attachments document (check the Windows Client Field in the LAYOUT PROPERTIES WINDOW and uncheck the Xytech Web Client and Phone Fields) that does not include the Attachment Column. This will prevent users from adding or opening files regardless of security settings.
Child Table Attachments
Layout Note: This feature requires a custom layout and is not displayed in standard layouts.
In a grid of child records, clicking the Attachment Count will display the Attachment window with attachments to the Parent Record as well as attachments to Child Records (e.g., Media Order Service Rows and Source Rows). This feature requires the following setup:
- In Document Customizations, under the Document Tables tab, select (check) the Enable Attachments checkbox.
- In the Layout Editor, add the Attachment Count field to the appropriate child table grid control.
FIELD DEFINITIONS
Action
This field displays what action the system will take with regard to the attached document.
If you are adding a new attachment to the Xytech Web Client document, this field displays 'Select'.
When you click 'Select', the system opens the file browser window for your device by default unless the value in the Type Field has a folder defined in the Default Path Field in the Attachment Types Window.
If you are opening an already-attached document, this field displays either 'Download' or 'Open', depending on the File Type.
- Click 'Download' to download the document to your device.
- Click 'Open' to open the document in a browser window on your device.
Description
This required field defaults to the filename of the current attachment, but you can modify it as needed.
Type
Select the file type of the current attachment from the drop-down list.
After adding a file as an attachment, a value will default into this field if the file type has been established in the Attachment Types Window, but you can change it as needed.
NOTES
- If you select a value in this field that has a f older defined in the Default Path Field in the Attachment Types Window before using the Action to launch a Browse dialog box, the system opens that defined folder.
- If you select a value in this field before using the Action, the system will automatically filter out all files that do not equal the selected file type from the Browse dialog box.
Attachment Pathname
This read-only field displays the path of where the current attachment is stored.
Attachment Filename
This read-only field displays the filename of the current attachment.
Active
Check this box to make the attachment available to Users. If this box is unchecked, the attachment will not be shown in the Attachments window.
Note
Click the Note icon to open a separate text notes window.
Date Added
This read-only field displays the date and time that the current attachment was added.
User Added
This read-only field displays the user name of the person who added the current attachment.
STANDARD BUTTONS
Save & Close 
Closes the window and saves any unsaved changes to the current record.
Cancel 
Closes the window and disregards any unsaved changes to the current record.
Save 
This button saves the current record.
Attachment 
This button opens the Attachments Window so that you can link one or more files to the current record. If attachments have already been linked to the record, the number of attached files will be displayed in the button.
Navigation Buttons 
When the current record is opened via a search list, a set of navigation buttons will appear that allow you to navigate to (open) the next, previous, first, or last record in the list without leaving the window. Refer to the Application Maintenance Window BUTTONS AND TOOLS topic for more details.
Actions / Layout Settings 

These buttons access the standard list of Actions / Layout Settings Button commands, which include the ability to save, refresh, duplicate, and delete the current record. For details on the standard Actions / Layout Settings Button menu commands, refer to the Application Maintenance Window BUTTONS AND TOOLS topic.
l>