Copyright ©2025 Fabric | Xytech Help Document Version 1.13
Need Help? Start Here — Welcome to Xytech Help | Xytech Basics | Xytech Notable Features | Using the Help - Best Practices | Xytech Support Web Site
AR Invoice Batch Invoice Tab
Xytech Standard AR Invoices Batch Application – Invoice Tab
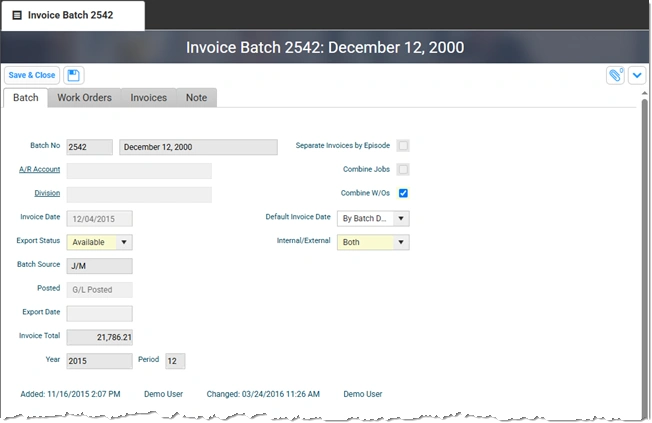
The Invoice Tab provides the form and fields necessary to create a new Invoice Batch. Open a new Invoice Batch row by clicking on the ‘' icon at upper right-hand corner of the field. Delete any rows you have created by highlighting that row and clicking on the '‘ icon at the upper right-hand corner of the field.
Once all of the fields have been filled in, click the ‘Save & Close’ button. If you want to abandon the new Invoice Batch, click the ‘Cancel’ button.
NOTE: Not all fields present in this tab are shown in the example above. All columns described in the Field Definitions that follows, and other fields, are available for use in custom layouts.
FIELD DEFINITIONS
Batch No.
The system automatically assigns the next sequentially available record ID number when you initially save a new record.
Description
Enter a unique description (up to 40 characters, alphanumeric) for each batch record you create.
Customer
Enter the appropriate customer ID number for each line item you create. Click on the ellipsis (…) box to have Xytech show a Contacts list from which you can choose.
Customer Name
Click on this field to have Xytech autofill the Customer Name associated with the Customer ID in the Customer field.
Invoice Type
Use this field’s drop-down list to indicate the appropriate invoice type for each line item you create.
Invoice No
Enter an invoice number (up to 20 characters) for each line item you create or let the system assign the next sequentially available number. This field becomes read-only when the system saves the information.
Invoice Date
Defaults to today’s date. Use the calendar icon to select a different date.
Amount
Enter the appropriate amount, in the customer’s base currency, for each line item you create. If the invoice is to be paid in a foreign currency, the system will automatically populate this field based on the entries in the ‘Currency’ and ‘Fc Amount’ fields.
Fc Amount
If this invoice is referencing a Job that will be paid in a foreign currency, enter the amount of the invoice in that currency here.
Currency
Use the dropdown arrow to select which foreign currency is being used in the Fc Amount field.
Tax 1 Amount
This field is automatically populated by the system based on the Tax Code that is defined in the Customer record for the Customer being invoiced.
Tax 2 Amount
This field is automatically populated by the system based on the Tax Code that is defined in the Customer record for the Customer being invoiced.
Fc Tax1 Amount
This field is automatically populated by the system based on the Tax Code that is defined in the Customer record for the Customer being invoiced.
Fc Tax2 Amount
This field is automatically populated by the system based on the Tax Code that is defined in the Customer record for the Customer being invoiced.
Term
This field defines the payment terms associated with this Invoice Batch. Use the dropdown arrow an click on the appropriate term value (e.g. Net 30).
Job
This field gives you the ability to associate a corresponding Job Record ID number with each line item you create. Use the dropdown arrow to select the appropriate Job ID. This field is for reference purposes only and will not result in any other actions being taken by the system.
Job Description
The system populates this read-only field with the current job’s Description Field value.
Account Rep
This field’s drop-down list gives you the ability to associate an account representative with the corresponding job. (The value defaults to the one specified in the corresponding Job Record.)
PO
This field gives you the ability to associate a purchase order with the corresponding job. You can use the drop-down list’s preset values or enter a different value. (The value defaults to the one specified in the corresponding Job Record.)
Invoice Note
Accesses a separate Invoice Note Window so you can associate a text note with each line item you create.
Division
This field’s drop-down list gives you the ability to associate a division with the corresponding job. (The value defaults to the one specified in the corresponding Job Record.)
STANDARD BUTTONS
Save & Close 
Closes the window and saves any unsaved changes to the current record.
Cancel 
Closes the window and disregards any unsaved changes to the current record.
Save 
This button saves the current record.
Attachment 
This button opens the Attachments Window so that you can link one or more files to the current record. If attachments have already been linked to the record, the number of attached files will be displayed in the button.
Navigation Buttons 
When the current record is opened via a search list, a set of navigation buttons will appear that allow you to navigate to (open) the next, previous, first, or last record in the list without leaving the window. Refer to the Application Maintenance Window BUTTONS AND TOOLS topic for more details.
Actions / Layout Settings 

These buttons access the standard list of Actions / Layout Settings Button commands, which include the ability to save, refresh, duplicate, and delete the current record. For details on the standard Actions / Layout Settings Button menu commands, refer to the Application Maintenance Window BUTTONS AND TOOLS topic.
ACTION MENU COMMANDS
Export
Prompts the system to create an Excel spreadsheet of the Invoice Batch and download it to your device.
View Batch Journal
Accesses the Invoice Journal Window so you can preview and print an Invoice Journal Report for the current record.
View Invoice Form
Accesses the Invoice Form so you can preview and print the Invoice form for the current record.
Document
Presents a dropdown menu of several actions that can be taken regarding the Batch documentation. Actions that are greyed-out cannot be selected. The Invoice Batch can have additional contacts added or be saved in XML from here.
~