Copyright ©2025 Fabric | Xytech Help Document Version 1.13
Need Help? Start Here — Welcome to Xytech Help | Xytech Basics | Xytech Notable Features | Using the Help - Best Practices | Xytech Support Web Site
Order Transactions Maintenance Window
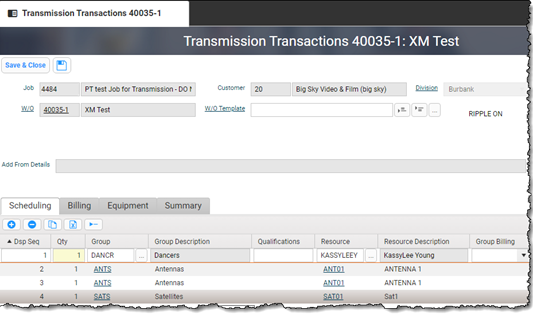
Xytech Standard Transmission Transaction Maintenance Application – Job Tab Page
JOB AREA FIELD DEFINITIONS
Job Number / Description
Xytech automatically displays the Job Number and Description of the Job to which this Transmission Transaction is assigned. This field is read-only.
Customer / Description
Xytech automatically displays the Customer ID and Description for the customer assigned to this Transmission Transaction. This field is read-only.
Division
This field is only available if you are using the Divisions functionality.
Xytech automatically displays the customer Division to which this Transmission Transaction is assigned. This field is read-only.
Work Order (W/O)
Xytech automatically displays the Work Order to which this Transmission Transaction is assigned. This field is read-only.
W/O Template
Click on the W/O Template link to create a new Work Order Template document or click on the Lookup icon to open a search list where you can select the Work Order Template to load into this Transmission Order Transaction.
Once you enter or select a Template, click the Append Icon to append the Template’s Transactions to the end of the list of the existing list or click the Insert Icon to insert the Template’s transactions directly above the selected transaction. You can add as many templates as you wish, but they must be loaded one at a time. Transactions added in this manner do not link to any Service Rows or Operations in the Transmission Order.
Ripple On
If the Action Menu Command ‘Ripple On’ has been toggled on, this text will display in the field to show that status and Xytech will ripple updates throughout selected linked Orders. If this note is not present, then Xytech is not rippling updates.
Add From Details
If a selected Transaction is linked to another application (e.g., Purchase Order, Time Card Batch Maintenance Applications), the system will display a hyperlink in this field that identifies the linked record. Clicking the hyperlink will prompt the system to open to the location on the record and will highlight the row that created the Transaction (e.g., the Detail Row on a Purchase Order record).
SCHEDULING TAB FIELD DEFINITIONS
NOTE
Many columns on this tab are also present on the Billing, Equipment and/or Summary tabs. Values set on this tab are displayed in the columns on the other tabs where they appear. Changing the value in a column on one tab will change that value in all tabs
DSP Seq
Each time a new line item is added to the Scheduling Tab, the system automatically assigns the next available row number in this read-only field.
NOTE
If you rearrange the order of the rows via the drag-and-drop technique, you must choose the Update Transaction Order Action to save the new sort order. Transactions, unlike many other list documents, do not automatically re-sort on save.
Qty
The value in this field defaults to one (1) for manually added items or the value assigned in the Work Order Template when a template is applied. You can override this default value as needed (up to a value of 32,000). Value may only be 0 or 1 if a Resource is assigned to the transaction. This is primarily used when scheduling only by Group.
A value of 0 here means the transaction will not show as a booking on the Schedule Book or Calendar Gadget.
Group / Description
Enter a Scheduling Group Code if you want to establish a specific Group value for the current Transaction line item or use the Lookup Icon for help in locating one. Once selected, the description will fill in automatically.
Selecting a value in this field helps limit the options available for the Resource, Qualifications and Group Availability fields.
NOTES
} If you enter some or all of a Group’s Code and more than one partial match are found, the system will open the Scheduling Groups Search List Window displaying all of the Groups that match your entry fully and/or partially.
} If you do not select a value in this field but you select one in the Resource Field, that Resource’s default Group will automatically populate this field. (Refer to the GROUPS TAB PAGE of the Scheduling Resource Maintenance Application for additional details about default groups.)
Qualifications
Select one or more values to filter which Resource may be selected for the Transaction.
Refer to the QUALIFICATIONS STEP-BY-STEP topic for details.
Resource / Description
Enter a Scheduling Resource Code to establish a specific Scheduling Resource value for the current Transaction line item or use the Lookup Icon for help in locating one. Once a Resource has been selected, the read-only description field will automatically populate.
AUTOMATIC LOOKUP PROCESS
Entering partial text into this field prompts the system to do an automatic search for Scheduling Resource records whose Code and/or Description Field values match either exactly or partially. If one Scheduling Resource record’s Code or description matches, the system will load that Resource onto the current line item. (Once the system finds one Resource Code that matches partially or exactly, it does not search for matching Resource Descriptions. Only if no match is made by Code will the system then search for a match by Description.)
If the value entered into this field matches and/or partially matches the Codes of multiple Scheduling Resource records but doesn’t match any Resource Descriptions (or just one Description), the system opens the Group Resource List Window and displays those Code-matching Resources, from which you can select and apply one to the current Transaction. Conversely, if this field’s value matches and/or partially matches the Descriptions of multiple Scheduling Resource records but doesn’t match any Resource Codes, the system opens the Group Resource List Window and displays those Description-matching Resources for your selection and application.
However, if the value entered into this field fully and/or partially matches both the IDs and descriptions of multiple Scheduling Resource records, the system will first open the Group Resource List Window and display the Resources that match by Code. The system will then open the Scheduling Resources Search List Window and display those Resources that matched by Description. Both windows are needed because the system cannot display the results of both searches (Code and description) in the same window. You may select and apply one Resource from either window to apply to the current line item.
Finally, if the value entered into this window doesn’t match any Resource Code or Description even partially, the system opens the Group Resource List displaying no results.
NOTES
} If the Automatic Lookup process prompts the system to open the Group Resource List Window because it matched multiple Resource Code or Description Field values to the value entered into this field, you may see the same Resource(s) listed more than once because this window searches for Resources based on Scheduling Groups. If a Resource that meets the search criteria belongs to more than one Scheduling Group, it will be listed in the window one time for each Group. This allows you to select the appropriate Resource and Group combination to apply to the Transaction.
} The Group Resource List Window Resource will display an availability conflicts icon next to Resources belonging to Scheduling Groups that have the DISPLAY RESOURCE AVAILABILITY FIELD checked. If it shows, that Resource has been booked on another order or a Time Off during some or all of the time covered by the current Transaction.
} If you select a value in this field before you select one in the Group Field, the Resource’s Default Group will automatically populate the Group Field. (Refer to the GROUP TAB PAGE of the Scheduling Resource Maintenance Application for additional details about Default Groups.) Note: You may not assign a Resource to a Transaction without also assigning a Group.
} When you select a value in this field, the system automatically checks the Active and Inactive dates assigned to the SCHEDULING RESOURCE and determines if the Resource will be Active during the entire range of the Transaction based on the Begin / End Date Field values of the Transaction. If the Resource is determined to be Inactive at any time during the Transaction's schedule, the system will not allow you to add the Resource.
Also, if a Resource that you try to add to a Transaction row is currently Inactive but becomes Active in the future for the duration of when the Transaction's date range falls, the system will permit the selection of the Transaction.
} The Group Resource search list has an 'Active' column available to be added to the layout. Check this box in the search criteria and Xytech will return only Active Resources in the Group. If the box is left unchecked, both Active and Inactive Resources will be displayed.
Group Billing
Use this field’s drop-down list to assign a Group Billing value to the current Transaction, which will prompt the system to automatically assign a Billing Code to the Transaction.
Group Billing values can be used to ensure that schedulers or other users don’t apply the wrong Billing Codes to the Resources associated with the Group. Refer to the GROUP BILLING STEP-BY-STEP topic for additional details.
NOTE
Values in this field will only be available if the Scheduling Group assigned to the Transaction has values established on the GROUP BILLING TAB PAGE of the Scheduling Group Maintenance Application
Begin / End Date / Time
Enter dates and times in these fields to indicate Beginning and Ending period for the current Transaction.
NOTES
} When adding a Transaction, these dates will default to the Order Start and Order End Field values of the current Order.
} Dates may be manually changed, but they must fall within the range of dates established in the Order Start and Order End Fields of the current Order. If not, the system will give you the option to automatically update the values of the fields on the Order to encompass the ones entered for the Transaction.
} The values in these fields may be automatically changed if the Order Start and Order End Field values of the current Order are changed. (Refer to the Order Start and Order End Field definitions on the ORDER TAB PAGE topic.)
} When the Transaction line item Dates are changed and the UOM Field of that Transaction line item is set with a Base Unit of Measure for either Hour, Day or Week “Scheduled”, the bill unit will be updated via that calculation logic.
For example, the Billing Code RENTAL is set to the Base Unit of Measure of Days - Scheduled Days. When the Billing Code is first added to a Transaction with dates of 12/18/15–12/20/15, the Billing Unit Field will default to 3. If the End Date Field of the Transaction is changed to 12/30/15, the Billing Unit will change to 13.
} If you are licensed and configured for the MASTER TIME feature, the values in this field will always display according to the current system time zone or the time zone that has been assigned to the window manually via the Time Zone command in the Layout Settings menu.
} For Media Orders and Transmission Orders, the values in these fields may default from the "Service Row Start" and "Service Row End" Fields. Additionally, the values in these fields may be automatically changed if the "Service Row Start” and "Service Row End" Field values are changed.
Changing the values in these fields to fall outside of the time period established in the "Service Row Start" and "Service Row End" Fields will also automatically update the service row dates and times. (Refer to the Service Row Start and Service Row End Field definitions on the Media Order Maintenance Application’s SOURCES &SERVICES TAB PAGE topic for additional details.)
} Starting in Version 9.0, Date and Time calculations for days has been changed. Prior to Release 9, the following logic was used:
} A Resource scheduled to Begin on 1/1 at 2pm and to End on 1/7 at 11:59 pm was calculated as 8 days.
} A Resource scheduled to Begin on 1/1 at 2pm and to End on 1/7 at 00:00 am was calculated as 6 days.
} A Resource scheduled to Begin on 1/1 at 2pm and to End on 1/7 1:59 pm was calculated as 7 days.
Starting in Version 9.0, all of the above scenarios will calculate as 7 days if the Base Unit of Calculation is ‘Days - Scheduled Days’. If the Base Unit of Calculation is ‘Days - Scheduled Time’, above existing functionality applies.
Note / Invoice Note
Both of these icons open a separate Notes Window that gives you the ability to associate text notes with the current Transaction.
Transaction Notes Window
This window has two tabs at the top – Note and Invoice Note – that allow you to store two separate notes for each Transaction. The window will default to the tab that corresponds to the icon you select.
USAGE
} The text that you enter on the Note Tab Page will be printed directly below the Transaction item itself when a Work Order or Media Order Form is generated using the default layout.
} The text that you enter on the Invoice Note Tab Page will be printed directly below the Transaction item itself when an Invoice Form is generated using the default layout.
Phase
This field defaults to the Phase Field value assigned to the Order, but you can edit it as needed. NOTE: Not all values are valid for selection (I.e. Invoiced is not valid)
The Phase assigned to the current Transaction may determine the color of the corresponding booking object in the Schedule Book.
NOTE
When the Phase of the Order is updated and the Order is saved, all Transactions with Phases that match the Order before it was changed will also be automatically updated while those that do not match will not be changed. The exception here is when the Order is added to an invoice batch then invoiced. These events will both change the Phase of both Order and all Transactions.
Billing Description
This field displays the Billing Description assigned to the Billing Code for this row as assigned on the Billing tab. It can be edited for the current Transaction.
Week Number
The system automatically generates this read-only field indicating the current week of the fiscal year.
Conflict
If this field has a check mark in it, that indicates the Resource assigned to the current Transaction has already been scheduled for some portion of the designated time period. User can choose the Conflicts action to see the list of conflicts.
Continuous
Activate this field if the values entered in the Begin/End Date/Time Fields span the entire length of time as opposed to being repeated a certain number of times within that timeframe.
EXAMPLE
The Begin Date / Time Field is set to 10/20/2010 09:00 a.m. and the End Date / Time Field is set to 10/22/2010 05:00 p.m.
} If the Continuous Field is activated, the scheduled time would run straight through from 09:00 a.m. on the 20th through to 05:00 p.m. on the 22nd with no breaks.
} If the Continuous Field is not activated, the scheduled time would cover three days: 09:00 a.m. to 05:00 p.m. on the 20th, 21st, and 22nd.
In the Schedule Book, booking bars will only display for the span between times. In above example if Continuous is not checked, booking bars will show from 9am to 5pm on the 20th, 21st and 22nd.
For Billing, if Continuous is not checked and the ‘Unit Type’ has a Base Unit of Calculation that is determined by the scheduled dates and times, only those times covered by the “on” time will set the Unit. In above example, 9 a.m.-5 p.m. is 8 units. If Continuous is not checked, billing unit will be 24 (8x3). If Continuous is checked, it will be 56.
Setup
Enter a time value in this field to establish the amount of time it takes to set up the Scheduling Resource assigned to the current Transaction. You may enter up to three digits followed by one of the following letters: M, H, or D, which represent minutes, hours, and days respectively. For example, entering 2H means that it will take two hours to be set up.
If the time it takes to set up the current Resource plus the value entered in the Bumper Field overlaps with other scheduled bookings, the system displays the value Setup/Bumper in the Conflict Type Field of the Conflicts Window. This will help you know that bookings for the current Resource have been scheduled too close together to complete any necessary set up and break down/reconfiguration activities.
NOTES
} When adding or changing the Setup Field value on an Order, the value in this field will always inherit its value from the Order if this field does not currently have a value. If this field already has a value, it will not be changed when the Order is updated.
} The value in this field may default from either the Resource record or the Work Order template. If both have default Setup Field values assigned, the value in the Work Order template will take precedence.
} The system will not issue any alerts or change the color of the conflicting Booking Bars if this type of conflict occurs.
} If other conflicts exist for the current Resource, these will be displayed on separate rows in the Conflicts Window.
EXAMPLE
It is necessary from a technical configuration standpoint to allow for 10 minutes of set up time for each use of the Resource 'Antenna 1', so a value of 10M is entered in the Setup Field. In addition, it takes 5 minutes to reconfigure the antenna before it can be used again, so a value of 5M is entered in the Bumper Field. The total amount of time needed between bookings is 15 minutes.
Antenna 1 is scheduled on Order No. 1234 from 10:00 a.m. to 10:15 a.m. and scheduled on Order No. 5678 from 10:25 a.m. to 10:35 a.m. Because only 10 minutes exist between the last End Time and the next Begin Time, a Setup/Bumper conflict is present. As a result, the Conflicts Window will contain two rows for Antenna 1, one row for Order No. 1234 and one row for order No. 5678, both indicating a Setup/Bumper conflict for Antenna 1.
Bumper
This field operates the same as ‘Setup’ above.
EXAMPLE
It is necessary from a technical configuration standpoint to allow for 10 minutes of set up time for each use of the Resource 'Antenna 1', so a value of 10M is entered in the Setup Field. In addition, it takes 5 minutes to reconfigure the antenna before it can be used again, so a value of 5M is entered in the Bumper Field. The total amount of time needed between bookings is 15 minutes.
Antenna 1 is scheduled on Order No. 1234 from 10:00 a.m. to 10:15 a.m. and scheduled on Order No. 5678 from 10:25 a.m. to 10:35 a.m. Because only 10 minutes exist between the last End Time and the next Begin Time, a Setup/Bumper conflict is present. As a result, the Conflicts Window will contain two rows for Antenna 1, one row for Order No. 1234 and one row for order No. 5678, both indicating a Setup/Bumper conflict for Antenna 1.
Row Display
The text entered in this field is often the text label for the corresponding Booking bar(s) in the Schedule Book. It will not inherit from the Order Row Display.
Sched Unit
This field allows you to enter and view planned Resource assignments based on Units of Time instead of specific Begin and End Times. You can also use this field to compare the Scheduled Unit, Billing Unit, and Actual Unit Field values during the billing review process.
The value in this field will be calculated in hours based on the Begin and End Times of the current Transaction. If Continuous is not checked, this will only calculate the number of hours per day (see more above).
BACKGROUND
This method of scheduling and viewing Resource assignments based on Units of Time instead of specific Begin and End Times is typically referred to as nonscheduled assignments or resource planning and is useful when you do not know the actual Begin and End Times of a task but you know how much time the task should take to perform.
NOTES
} If the "Deduct Scheduled Breaks from Billing Units" and/or "Deduct Scheduled Meals from Billing Units" Fields have been checked in the PREFERENCES – JOB MANAGEMENT WINDOW, this field will be updated if Meals / Breaks are changed and regardless of how those fields were changed (e.g., from a Time Card Batch).
} Non-scheduled Transactions may create activity items in the Time Card Batch Application during the Load Schedule process if the Transaction’s Scheduled Quantity is zero (i.e., the Sched Qty Field = 0) and the Sched Unit Field value is greater than zero.
} If the current Transaction has been loaded into a Time Card Batch during the Load Schedule process and a user sets the Activity Field of the corresponding activity line item to a Not at Work value, the system will set this field (Sched Unit) and the Sched Qty Field both to zero.
Resource Quantity
This field will only be available if the Scheduling Resource assigned to the current Transaction has the 'Check Resource Capacity' Field checked on the IDENTIFICATION TAB PAGE of the Scheduling Resource Maintenance Application.
Enter a quantity in this required field that represents the size / volume / amount (e.g., office space, disc space, transmission bandwidth) that the current Transaction’s Scheduling Resource will be using during the Scheduled Date and Time range.
The system will use the value in this field in conjunction with the value entered in the Max Resource Qty Field on the Scheduling Resource’s CAPACITIES TAB PAGE to enforce whether or not the Resource is staying within its current defined capacity parameters. If the system detects that the Resource has been scheduled at a quantity that is over capacity, the system issues a warning when checking for conflicts. Additionally, in the Schedule Book, when you place your cursor over a booking that is included in the Resource Capacity Checking functionality, a hover text pop-up indicates the Amount of Capacity remaining / overbooked for the Resource, the Amount of Capacity used for the Resource, and the Total Capacity of the Resource.
EXAMPLE
You have a Scheduling Resource record called Building A, Floor 2 that represents office rental space. On the CAPACITIES TAB PAGE of the Resource, the Max Resource Qty Field for the capacity line item covering the timeframe of your Orders is set to 25,000, which in this instance represents 25,000 square feet.
The Building A, Floor 2 Scheduling Resource record is assigned to a Transaction of Work Order 1234 and is given a Resource Quantity Field value of 20,000. However, on a Transaction of Work Order 5678, the Resource Quantity Field is set to 15,000. Both Transactions cover the same timeframe.
When conflicts are checked (e.g., using the Find Booking Conflicts right mouse button menu command on a booking in the Schedule Book, using the Conflicts Actions menu command from the Order Transactions Window), the Conflicts Window will display the two Transactions that are in conflict, a conflict type of Overbooked, and a third line item that shows that the resource is over capacity by a value of 10,000.
Additionally, when you place your cursor over either of the two bookings in conflict, a hover text pop-up indicates that there is a negative Resource Quantity of 10,000 (shown as –10000), a used Resource Quantity of 35,000, and a total Resource Quantity of 25,000.
Plan ID / Description
Scheduling Resources can be assigned to a Bandwidth Plan when assigned to a Scheduling Group. The Bandwidth Plan assigns a frequency value for the channels the Resource will reserve on a transponder during a transmission.
The value in the Plan ID field is the Bandwidth Plan ID to which this Resource is assigned for the Transmission Order. The Description shown in this field is the Bandwidth Plan Description assigned to the Plan when it was created.
Both of these fields are read-only.
Invitation Status
This field shows the status of the collaboration meeting (e.g. Outlook, Teams) that was created as a result of an event that occurred that was associated with this Transmission Order.
This field is read-only.
Invitation Date
This field shows the date of the Outlook meeting that was created as a result of an event that occurred that was associated with this Transmission Order.
This field is read-only.
Invitation Time
This field shows the start time of the Outlook meeting that was created as a result of an event that occurred that was associated with this Transmission Order.
This field is read-only.
Payroll Rule
Choose a Payroll Rule to apply to this Order Transaction from the dropdown menu. This establishes the penalties that will apply to this Transaction for Payroll Rules in Time Card or Scheduling Counters for Scheduling module.
DOTA Exempt
Check this field if the Transaction requires exemption from the "Day Off Turnaround" payroll penalty, as defined by the Payroll Rule.
When this field is applied to the Transactions, it will be set when the Transaction is loaded into the Time Card. If DOTA exempt is set in the Time Card activity, then the Payroll Penalty for DOTA will not be applied to the Payroll Transactions.
BILLING TAB FIELD DEFINITIONS
NOTE
Many columns on this tab are also present on the Billing, Equipment and/or Summary tabs. Values set on this tab are displayed in the columns on the other tabs where they appear. Changing the value in a column on one tab will change that value in all tabs.
Billing Code / Description
Manually enter a billing code or use the Lookup Icon for help in locating one. Once a billing code has been assigned, the description will default automatically. The Description can be manually edited, although if the Code refreshes the Description will revert to default.
Rate Set Description
The majority of the time, this will default based on the Billing Code, the Order’s Rate Card, the Transaction dates and various other possible data points. It is possible that a Billing Code may be set up to allow the user to select a different value, which would update the Transaction Rate, Discount, Markup and Amount. Use the Lookup Icon for help in locating one.
Billing Qty
The quantity value in this field defaults to one (1) for manually added items or the value assigned in the Work Order Template when a template is applied. You can override this default value as needed (up to a value of 32,000).
The value in this field multiplies by the value in the adjacent Unit Type Field. Enter the number of Billing Units for the system to use (along with the Billing Quantity and Rate) in calculating the current Transaction item’s Billing Amount Field value. This is not typically used on scheduled transactions but can be very useful in billing only (no Group or Resource) transactions.
Typically, this value remains set at 1 and the value in the Unit Field changes to reflect the situation. The Billing Unit will multiply by the Rate(s), then that result will multiply by the Billing Qty to determine the Billing Amount.
Billing Unit
Enter the number of billing units for the system to use (along with the billing quantity and rate) in calculating the current detail item’s Amount Field value. This value will be automatically calculated if the Unit Type has a scheduled Base Unit of Measure. The Billing Unit could also be set by settings of a linked Service Row, PO Detail, Time Card Activity, etc. It could also be set by the result of a calculated formula that makes use of the Unit Base field (typically hidden in the standard layout).
Unit Type
This field defines how the Billing Unit is established from the scheduled times. A Unit Type may calculate units by days or hours or by not looking at the scheduled times at all.
Billing Rate
The system updates this value to reflect the rate associated with the current Transaction. Typically, this defaults from the Billing Code but you can override any default value as needed.
The system uses the value in this field along with the Billing Qty and Unit (and Discount or Markup, if present) in calculating the Billing Amount Field value for each Transaction.
You may also have access to a Rate Icon in this field. Clicking this icon will allow you to open a version of the appropriate Rate Set or RATE / MULTI RATE WINDOW so you may edit the rates for the current Transaction only; the changes you make do not affect the default rates established for the accompanying Billing Code. (This icon will not be applicable and the Rate will be “locked” if the Lock Rate Field has been checked on the Rate.)
NOTES
} The system performs a "get rate" function when assigning a Rate to a Transaction. This same functionality is used elsewhere in the system as well. Refer to the BILLING CODE / RATE SOURCE HIERARCHY topic for details
} If the current Transaction was created from a Purchase Order detail line item, and the Billing Code used on that line item is a Pass Thru pricing type Billing Code, then the value in this field will default from the Purchase Order detail item’s Cost Field and not from a Billing Code Rate.
Billing Discount
This field defines a discount percentage that will affect the calculated Billing Amount. It can default from the Billing Code or a template, but you can override any default value as needed.
If this field contains a value other than 0.00%, the system uses it in calculating the value for the current Transaction’s Billing Amount Field.
NOTES
} If you enter a value in this field, the system automatically updates the value in the Discount Amount Field to reflect the change; this gives you the ability to base discounts on a percentage amount or a specific dollar amount.
} If the current Transaction was created from a Purchase Order detail line item, and the Billing Code used on that line item was a Pass Thru pricing type Billing Code, then the value in this field will default from the PO detail item’s Discount Field.
Discount Amount
The system updates this value to reflect the discount amount associated with the current Transaction’s Billing Discount. You can override any default value as needed.
If this field contains a value other than 0.00, the system uses it in calculating the value for the current Transaction’s Billing Amount Field.
NOTE
If you enter a value in this field, the system automatically updates the value in the Discount Percentage Field to reflect the change; this gives you the ability to base Discounts on a percentage amount or a specific dollar amount
Billing Markup
The system updates this value to reflect the Markup associated with the current Transaction’s Billing Markup. You can override any default value as needed.
If this field contains a value other than 0.00%, the system uses it in calculating the value for the current Transaction’s Billing Amount Field.
NOTE
If you enter a value in this field, the system automatically updates the value in the Markup % Field to reflect the change; this gives you the ability to base Markups on a percentage amount or a specific dollar amount.
Markup Amount
The system updates this value to reflect the Markup amount associated with the current Transaction’s Billing Markup. You can override any default value as needed.
If this field contains a value other than 0.00, the system uses it in calculating the value for the current Transaction’s Billing Amount Field.
NOTE
If you enter a value in this field, the system automatically updates the value in the Markup Percentage Field to reflect the change; this gives you the ability to base Markups on a percentage amount or a specific dollar amount.
Extended Rate
The system automatically updates this field based on a calculation of the value in the Billing Rate Field together with any values that may be present in the Markup and Discount Fields.
IMPORTANT!
You can also manually enter an overriding value in this field, prompting the system to adjust the values in the Markup or Discount % / Amount Fields accordingly. Warning: Doing so will override any Rate Set multi-rate values.
However, the system only permits a markup value of 999.99% or less. This means if you enter an Extended Rate that exceeds the Transaction’s Rate by 10 times or more, the system issues an error message to this effect. The message also asks if you want to update the Billing Rate to the Extended Rate. If you use the message window’s 'Yes' Button, the system updates the Bid Rate to mirror the Extended Rate and leaves the Markup at 0%; if you use the window’s 'No' Button, you must then adjust the Extended Rate to an acceptable amount.
Billing Amount
The system calculates the value in this read-only field based on the Billing Quantity, Unit, and Rate (and Discount or Markup, if present) of the current Transaction. This is the amount that will be invoiced.
Cost Total Amount
This read-only field displays a value based on the following calculation of values from other fields for the current Transaction:
[ (Cost Unit × Billing Cost 1) + (Cost Unit × Billing Cost 2) ]
Note / Invoice Note
Both of these icons open a separate Notes Window that gives you the ability to associate text notes with the current Transaction.
Transaction Notes Window
This window has two tabs at the top – Note and Invoice Note – that allow you to store two separate notes for each Transaction. The window will default to the tab that corresponds to the icon you select.
USAGE
} The text that you enter on the Note Tab Page will typically be printed directly below the Transaction item itself when a Work Order or Media Order Form is generated.
} The text that you enter on the Invoice Note Tab Page will typically be printed directly below the Transaction item itself when an Invoice Form is generated.
FC Rate / FC Amount
These calculation fields derive their values from calculating the Base Rate and the current Exchange Rate as established in the System Module and then applying that rate to the Billing Amount, or vice versa. See FOREIGN CURRENCY CONSIDERATIONS for more information.
NOTE
} You can also enter foreign currency amounts in the FC Amounts Field, which prompts a calculation with four-digit precision back to the Base Rate Field.
Rate Source
The system automatically populates this read-only field based on the source of the current Transaction item’s Rate. (Refer to the BILLING CODE / RATE SOURCE HIERARCHY topic for details on how the system determines the rate source.)
Field values include the following:
Bid The system draws the rate from an approved Bid on the associated Job.
Deal Memo The system draws the rate from the associated Customer’s active Deal Memo.
Prorated The rate has been calculated using the Job and Work Order Flat Bid proration logic or the Transaction is within a Billing Package. See TRANSACTION BILLING PACKAGES STEP-BY-STEP for more information.
Order Rate Card The system draws the rate from the Rate Card associated with the current Work Order.
Standard Rate Card The system draws the rate from the Standard Rate Card for the Billing Code. (The “Standard Rate Card” is the RATE CARD with the ID Field value of 1.)
Resource The system draws the rate from the Resource Billing Code on the IDENTIFICATION TAB PAGE of the corresponding Scheduling Resource’s record.
Resource Group The system draws the rate from the Billing Code on the GROUPS TAB PAGE of the corresponding Scheduling Resource’s record.
Group The system draws the rate from the Billing Code on the IDENTIFICATION TAB PAGE of the corresponding Scheduling Group’s record.
Group Billing The system draws the rate from the Rate Card for the corresponding Billing Code on the GROUP BILLING TAB PAGE of the corresponding Scheduling Group record.
Manual The system draws the rate from a user manually overriding one of the above default rates.
Override
If the current Order is part of a Flat Bid, its associated Order record has a value in the Flat Amt Field, or if the Transaction is within a billing package, the system prorates its Billing Amount Field value based on the Flat Bid / Flat Amount / Package total and the other items that are part of the Flat Bid/Total. However, if you designate the current Transaction as an Override item by checking this field, the system doesn’t prorate the item but instead adds its amount to the amount of the Flat Bid / Flat Amount or adds it in addition not the billing package total. This field can be defaulted by the Trx Override option on the Order header.
Skip Prorate
Activating this field for a selected Transaction line item prompts the system to not prorate the Extended Rate Field value for that Transaction.
Cost Unit
This field gives users the ability to bill a number of Billing Units and separately track the number of Cost Units an item requires.
Defaults to zero (0.00) for manually added items but the system updates this value to reflect change made to the value in the Billing and/or Actual Unit Fields. See the Cost Unit option in Job Management Preferences. You can always override this update by manually entering a different value as needed.
If this Transaction is linked to a Time Card Activity, Cost Unit will be 1.00. This is because the total of the Activity will set the Billing Cost 1 field (See next).
Billing Cost 1
The system updates this value to reflect the Cost 1 Field value associated with the Billing Code Rate for the Billing Code assigned to the current Transaction. You can override any default value as needed.
The system uses this field as one of the values it calculates in determining the cost associated with the current Transaction.
TIME CARD BATCH NOTE
If the value in the Cost 1 Field of the Billing Code Rate Set assigned to the current Transaction’s associated Time Card Batch activity line equals zero (0.00), the system uses the value in the Cost / Hour Field of the associated EMPLOYEE’S PROFILE times the Hours of the activity to determine the value in this field during posting of the batch.
FUNCTIONALITY
Regardless of whether a billable Time Card Batch Action Item's corresponding Order Transaction was generated via the Load Schedule process, by creating an Order from the Time Card Batch record, or by linking an existing Order to the activity line, the system calculates the Billing Cost 1 Field value of the Transaction as follows:
1. It will first look to the Cost 1 Field value in the Rate Window of the action line's associated Billing Code . If that value is greater than zero (0.00), the system will use that value times the Scheduled Units of the activity line to generate the Billing Cost 1 Field value of the Transaction.
2. If the Cost 1 Field value of the Billing Code's rate equals zero (0.00), the system will then look to the value set in the Cost / Hour Field in the EMPLOYEE PROFILE. That value times the activity’s Scheduled Units will be used to generate the Billing Cost 1 Field value of the Transaction. (This is true even if the Cost / Hour Field value equals zero (0.00).)
NOTE: If Payroll Rules or Scheduling Counters are being used in Time Card, the above process differs slightly but the end result is mostly the same: the Time Card Activity’s total will set the Transaction’s Billing Cost 1.
If Cost 1 does not have a value, the Billing Rate Field value from the Employee Profile is used in this process.
EXAMPLES
In the following scenarios, the Unit Field values for all activity lines on a Time Card Batch are 8.
From the Employee Profile:
} Billing Rate = 250.00
Cost 1 using the employee Billing Rate would be 250.00 × 8 = $2,000.00
} Cost / Hour = 145.00
Cost 1 using the employee Cost / Hour would be 145.00 × 8 = $1,160.00
Billing Codes with Costs:
} A Billing Code with a pricing type of Normal is used on an activity line and has a Cost 1 = 70.00
Cost 1 using the normal Billing Code cost would be 70.00 × 8 = $560.00
} A Billing Code with a pricing type of Pass Thru is used on an activity line and has a Cost 1 = 25.00
Cost 1 using the pass thru Billing Code would be 25.00 × 8 = $200.00
Results:
Billing Code
Cost / Rate
Transaction Cost 1 Value
Normal Billing Code With Cost
Billing Code Cost = 70.00
70.00 × 8 = $560.00
(Rate = $70)
Normal Billing Code Without Cost
Employee Cost / Hour = 145.00
145.00 × 8 = $1,160.00
(Rate = $145)
Pass Thru Billing Code With Cost
Billing Code Cost = 25.00
25.00 × 8 = $200.00
(Rate = $25)
Pass Thru Billing Code Without Cost
Employee Cost / Hour = 145.00
145.00 × 8 = $1,160.00
(Rate = $145)
Billing Cost 2
The system updates this value to reflect the Cost 2 Field value associated with the Rate Set for the Billing Code assigned to the current Transaction. You can override any default value as needed.
The system uses this field as one of the values it calculates in determining the cost associated with the current Transaction.
Tax
Use this field’s drop-down list to manually assign a Tax value or override an existing value.
Default values can derive from a variety of locations in addition to the Tax Field value assigned at the Order level. These locations can include the Tax value associated with the current Transaction item’s Billing Code or Tax values associated with Movement records. Manually assigning a Tax value overrides all Tax values that default from other locations.
Actual Unit
If the current Work Order has been ACTUALIZED, the Actual Units recorded for the current Transaction will appear in this field.
NOTES
} You may manually edit the value in this field, and, if the Billing Code on the current Transaction is set to do so (via the Update Billing Unit when Actualizing Field in the BILLING CODE MAINTENANCE APPLICATION), the system will automatically recalculate the Transaction’s Billing Unit Field value.
Be aware, however, that making such a manual edit will likely result in this field’s value not equaling the sum of the Unit Field values on the Actions rows linked to the corresponding Transaction in the ORDER ACTUALS WINDOW.
} The Actual Unit Field value of an activity row on a TIME CARD BATCH RECORD will set the value in this field if the current Order Transaction links to that activity row. If Meals / Breaks are set on the activity row, the Actual Unit Field on that row will automatically adjust and be passed down to the current Transaction. This, in turn, will also update the Billing Unit Field of the current Transaction if its Billing Code is set to do so (via the Update Billing Unit when Actualizing Field in the BILLING CODE MAINTENANCE APPLICATION).
Group / Description
This is the same field as is found in the Scheduling Tab and functions in the same way.
Resource / Description
This is the same field as is found in the Scheduling Tab and functions in the same way
Begin / End Date / Time
This is the same field as is found in the Scheduling Tab and functions in the same way
Phase
This field defaults to the Phase Field value assigned to the Order, but you can edit it as needed.
The Phase assigned to the current Transaction determines the color of the corresponding booking object in the Schedule Book.
NOTE
When the Phase of the Order is updated and the Order is saved, all Transactions with Phases that match the Order before it was changed will also be automatically updated while those that do not match will not be changed.
Bid Detail No.
This field is only functional if the PREFERENCES – BID WINDOW'S Use Bid Linking Field is Active and the current Transaction’s Order is linked to a Job record and that Job has an Approved Bid.
This field will display the detail row number on the Order’s related Bid that corresponds to the current Transaction via Bid Linking.
If needed, you may use the Lookup Icon in this field to open the Bid Detail Select Window so you can choose the correct Bid Detail Item to link to the current Transaction. (See the Bid Detail Description and Bid Link Issue Field definitions below for more details.)
Bid Detail Description
This field is only functional if the PREFERENCES – BID WINDOW'S Use Bid Linking Field is Active and the current Transaction’s Order is linked to a Job record and that Job has an Approved Bid.
This field will display the read-only detail row description or the Bid Detail No selected above.
Automatic Link
After you assign a Billing Code to the current Transaction, the system will automatically try to determine a Bid Detail item to link to the current Transaction per the Billing Hierarchy
1. It will try to match the Order Type assigned to the current Transaction’s Order Record to the Order Type assigned to a header row on the Bid record. If no such match can be made, the Transaction will link to a Bid detail item under a header with no Order Type assigned.
2. Then it will try to match the current Transaction to a Bid Detail Item based on the Billing Code, Group, Resource, and/or Group Billing Field values on the current Transaction. Matches are determined as follows:
a. Group, Resource, and Group Billing all match
b. Group and Resource match; the Bid Detail does not have a Group Billing value
c. Group matches; the Bid Detail does not have a Resource or Group Billing value
d. The Bid Detail has no Group, Resource, or Group Billing values
Once a Transaction finds a Bid Detail item to link to, this field will display the Billing Description Field value of the linked Bid Detail item. If a Transaction cannot link to any Bid Detail item automatically, this field will be blank.
If multiple Bid Detail matches are made, the Rate the system uses for the Transaction will be derived from the first Bid Detail item in the list. This will prompt the system to check the Bid Link Issue Field on the Transaction and the Order itself. You can, however, manually link the current Transaction to the correct Bid Detail item to resolve the issue (see below).
Manual Link
If multiple matches are made automatically, you may use the Lookup Icon in the Bid Detail No Field to open the Bid Detail Select Window so you can choose the correct Bid Detail item to link to the current Transaction. When a detail item has been selected, Bid Detail Description will display in this field.
The Lookup Icon will only be available if Approved Bid Detail items exist on the Bid and multiple Bid Detail items match the current Transaction. If there are multiple Bid Detail items that match the Transaction (thus making it “ambiguous” as to which one links to the Transaction), activating the icon opens the Select Bid Detail Window. This window allows you to select the appropriate Bid Detail item. You can tell if a Transaction has multiple Bid Detail matches if the Bid Link Issue Field has a check mark in it.
BID LINK USAGE
Bid Linking gives the system and you the ability to link detail line items from the current Order’s Approved Bid to Order Transactions. Bid Links ensure that Transactions pull the correct Rates from Bid Detail items. Bid Linking is required to link Transactions to Budgets
NOTE
If a value is assigned in the Bid Header Field on the ORDER TAB PAGE for the current Transaction’s Order record, the system will only try to link to the Bid Detail items grouped under that header.
Bid Link Issue
This field is only functional if the PREFERENCES – BID WINDOW'S Use Bid Linking Field is active and the current Transaction’s Order is linked to a Job record and that Job has an Approved Bid.
This field is an indicator that the system has found multiple Bid Detail items to link to the current Transaction (refer to the Bid Detail Description Field definition for information on how the system automatically links Transactions to Bid Detail items). You must use the Lookup Icon in the Bid Detail No Field to select the appropriate Bid Detail item to link to the Transaction. Once an appropriate Bid Detail item is selected, the check mark in this field is removed.
IMPORTANT!
If this field is checked, the current Transaction’s Work Order may not be added to an Invoice Batch record.
Trx Order Type
The field gives users the ability to apply and track ORDER TYPE values at the Transaction level in addition to the Order level.
This field’s default value can derive from a variety of sources that include the following:
} The value designated for the current Order record.
} The value designated for a corresponding Bid Detail item if the system autogenerated the Order at the point of Bid Approval.
} If the Transaction links to a detail item in a Purchase Order, the value defaults to the one specified in the corresponding PO’s Department Field (Info Tab Page).
} Transactions that link to Time Card activities, Stock assignments, and Library and Rental Movements all default to the value designated for the current Order record.
} The value designated for the current Transaction item’s Scheduled Group. This value overrides the Order default.
} The value designated for the current Transaction item’s Scheduled Resource. This value overrides the Order default and the Group default.
} The value designated for the current Transaction item’s Group Billing value. This value overrides the Order default, the Group default, and the Resource default.
} The value from the Service Row – Media or Transmission – that created the Transaction.
The system filters the available values in this field’s drop-down list to only display (A) those Order Types associated with the current Order’s designated Division and (B) those Order Types associated with no specific Division.
ACTIONS THAT CHANGE EXISTING VALUES
} Manually applying a new Order Type value in this field overrides existing values in other fields. This may include the recalculation of rates. (Refer to the BILLING CODE / RATE SOURCE HIERARCHY topic for details on Rate Recalculation.)
} Selecting a new Group, Resource, or Group Billing Field value overrides the existing value (provided the selected value contains a different default Order Type).
} Updating the Order Type value at the Order level.
BID NOTE
The system validates the value in this field against the values assigned to the corresponding Bid Detail item (if applicable) to find the right Bid Rate.
BC (Billing Code) Lock
This field will be automatically activated by the system if the Billing Code selected for the Transaction line item has the Lock Rate, Lock Discount, or Lock Markup Field checked for the Billing Card Rate Set. If a lock has been set, the corresponding fields will become read-only:
} If the Billing Code’s Lock Discount Field is set, the Disc %, Disc Amt, and Extended Rate Fields will be disabled for that Transaction.
} If the Billing Code’s Lock Markup Field is set, the Markup %, Markup Amt, and Extended Rate Fields will be disabled for that Transaction.
} If the Billing Code’s Lock Rate Field is set, the Billing Rate and Extended Rate Fields will be disabled for that Transaction.
NOTES
} If the Lock attribute is set on a Transaction line item, the Skip Prorate Field will also be automatically activated and any Locked Transactions will be excluded from all Billing Packages and Job and Order Flat Bid proration logic.
} When a Transaction is set to BC Lock, you can manually uncheck this box to "unlock" the protected fields. Unchecking this field will also deactivate the Skip Prorate Field by default.
Sched Unit
This is the same field as is found in the Scheduling Tab and functions in the same way
Package Billing Type
This field will only be editable for the Master row of a Transaction Billing package.
Use this field’s drop-down list on a Master row of a Transaction Billing package to determine how the system determines the amounts for the Transaction Billing package.
Allocation The Transaction Billing package will adjust and prorate packaged detail rows to equal the amount of the Master row. (Default functionality applied when no value is selected.)
Ratio Allows a Ratio Value to be assigned to each Package row (in the Package Ratio Field), thereby deciding how much of the Master row amount is allocated to the Package rows.
Sum Allows the Sum Total of each Package row amount to determine the amount of the Master row. (This is the reversal of the default functionality.)
Refer to the TRANSACTION BILLING PACKAGES topic for additional details and examples.
NOTE
A default value may be set in this field based on the Billing Code assigned to the Master row, but you can change it if necessary.
Package Ratio
This field will only be available for the Package Row(s) of a Transaction Billing package and only if the 'Package Billing Type' Field is set to Ratio.
Use this field to enter a value that represents how much of the Master row is allocated to the current Package row.
Refer to the TRANSACTION BILLING PACKAGES topic for additional details and examples.
EQUIPMENT TAB FIELD DEFINITIONS
NOTE
Many columns on this tab are also present on the Billing, Equipment and/or Summary tabs. Values set on this tab are displayed in the columns on the other tabs where they appear. Changing the value in a column on one tab will change that value in all tabs.
DSP Seq
Each time a new line item is added to the Equipment Tab, the system automatically assigns the next available row number in this read-only field.
NOTE
If you rearrange the order of the rows via the drag-and-drop technique, the number in this field stays the same, but the other line information is relocated.
Barcode
Enter a unique barcode number (alphanumeric, up to 20 characters) assigned to the current scheduling resource. (The value entered into this field must be unique among barcodes assigned to all scheduling resources. The system will prevent the entry and save of a duplicate barcode.)
You can also use a scanner to enter the number.
If a Resource has been assigned that has a Barcode, it will display here. Clearing this will also clear the Resource. The Group value will remain.
Serial No
The system populates this read-only field if a Serial No Field value is present on the selected resource’s corresponding record.
Qty
This is the same field as is found in the Scheduling Tab and functions in the same way
Group / Description
This is the same field as is found in the Scheduling Tab and functions in the same way
Qualifications
This is the same field as is found in the Scheduling Tab and functions in the same way
Resource / Description
This is the same field as is found in the Scheduling Tab and functions in the same way
Begin / End Date / Time
This is the same field as is found in the Scheduling Tab and functions in the same way
Note / Invoice Note
This is the same field as is found in the Scheduling Tab and functions in the same way
Phase
This is the same field as is found in the Scheduling Tab and functions in the same way
Billing Code / Description
This is the same field as is found in the Scheduling Tab and functions in the same way
Billing Unit
This is the same field as is found in the Scheduling Tab and functions in the same way
Billing Amount
This is the same field as is found in the Scheduling Tab and functions in the same way
Fc Amount
This is the same field as is found in the Scheduling Tab and functions in the same way
Resource Quantity
This is the same field as is found in the Scheduling Tab and functions in the same way
Subrental Serial No
This field will only have a value if the current line item is linked to a SUBRENTAL RESOURCE shipped via the Rental Module’s Check In / Out Maintenance Application.
This read-only field displays the serial number assigned to the current line item’s corresponding Subrental Resource Detail line item on a Check In / Out record linked to the current Work Order.
Subrental Vendor ID / Vendor Name
These fields will only have values if the current line item is linked to a SUBRENTAL RESOURCE shipped via the Rental Module’s Check In / Out Maintenance Application.
These read-only fields display the Subrental Vendor ID and Name assigned to the current line item’s corresponding Subrental Resource Detail line item on a Check In / Out record linked to the current Work Order.
SUMMARY TAB FIELD DEFINITIONS
NOTE
The columns on this tab are also present on the Billing, Equipment and/or Summary tabs. Values set on this tab are displayed in the columns on the other tabs where they appear. Changing the value in a column on one tab will change that value in all tabs.
STANDARD BUTTONS
Save & Close 
Closes the window and saves any unsaved changes to the current record.
Cancel 
Closes the window and disregards any unsaved changes to the current record.
Save 
This button saves the current record.
Attachment 
This button opens the Attachments Window so that you can link one or more files to the current record. If attachments have already been linked to the record, the number of attached files will be displayed in the button.
Navigation Buttons 
When the current record is opened via a search list, a set of navigation buttons will appear that allow you to navigate to (open) the next, previous, first, or last record in the list without leaving the window. Refer to the Application Maintenance Window BUTTONS AND TOOLS topic for more details.
Actions / Layout Settings 

These buttons access the standard list of Actions / Layout Settings Button commands, which include the ability to save, refresh, duplicate, and delete the current record. For details on the standard Actions / Layout Settings Button menu commands, refer to the Application Maintenance Window BUTTONS AND TOOLS topic.